
The basic steps for eFiling a new case are:
When initiating a case using the paper process the filer generally prepares a summons for the clerk to sign. This document is often submitted with the pleading. When the summons are signed by the clerk they are distributed to the sheriff or process server who serves the summons with the pleading information to the other parties of the case. Using the efile system certain types of summons are automatically generated and not prepared in advance by the filer. These automatically generated summons follow a pattern similar to the paper process. In the efile system rather than creating a summons document and then including this document in your submission you will instead supply the information necessary to generate the summons. To make such a request, when you are adding your documents in the Add a Document screen, you will select the Service Document category. Under the Service Document category you will see some entries that begin with Request... For example you will see:
You can select one of these types of documents to be included in your submission. When you select one of these entries you will not have the option to browse and upload one of these types of documents. Instead you will click the ADD button after you select one of these three types of documents. Clicking on the ADD button present a screen where you will answer some questions about the service. When you are finished filling out the information on the screen you will click the Next button at the bottom. From the information you entered the type of document you selected will be automatically generated. The generated document will be included in the list of documents for this submission at the bottom of the Add a Document page. You can click on the document link and download or view the document however the document is not complete or issued because the clerk has not yet signed the document. When you finish adding all the documents you need to included in this submission, complete any payments required, you will then send the information to the clerk. You will not receive a copy of the issued document until after the clerk reviews and files your documents. Once the information is recorded the issued document can be accessed through your receipt. Once the submission is updated with the final status a link in the receipt for the issued document will be included. To access your issued document use the following steps:
You are responsible to deliver the document to the sheriff or process server and pay them to serve the documents on the other parties.
This process to request issuance of one of these documents is not limited to just case initation but can be included in follow-up filings as well.
Preparing Documents
Before you file a new case, prepare your documents. Do this even before you log on. Make
sure you have written your complaint and electronically scanned any exhibits
that you want included with this submission.
Logging In & Selecting A Case Type Once you log on, click the New Case button or select eFile > New Case from the Home menu to display the Case Type options and begin creating a new case. Choose the type the matches the case you are filing (for example, Civil - Common Pleas Court , General Division).
Entering Case Information.The selected case type determines the process you will follow to create that case.
For example, selecting Civil as the case type displays the following options:
In File Reference No. box, type the file reference number to help you identify that case.
The file reference number is not assigned to the case by the court. Rather, it is a number that an attorney assigns to a case to help identify it. Some attorneys refer to the File Reference Number as a ‘Case Matter Number.’
If the defendant in the case is requesting a trial by jury, check the Jury Demand box.
In the Prayer Amount box, enter the prayer amount, the total claim being filed on this case.
Select the Action Type from the drop-down list.
If the case concerns a mortgage foreclosure action, enter the parcel number of the property involved.
If the case has already been filed in the past, enter the key information about any previous case, including the case number, judge, main plaintiff, and main defendant.
Enter as a reference any suits involving like issues and similar parties that may set precedents for this case.
Once you have provided the case number, judge, main plaintiff and main defendant for the first reference case, click the Add button to add that case as a reference. You can then continue adding other references cases.
NOTE: Keep in mind that no reference cases will actually be added to the case when it is saved unless you first click the Add button for each for each one before you save the case.
Adding Plaintiffs and Petitioners: To begin adding Plaintiffs to the case, click the Add My Parties button next to Case Participants. Clicking this button automatically associates the filing attorney with the party being added and displays the Add a Party Options.
Fill in the necessary information about the plaintiff. Items marked with an asterisk are required.
Note: Type only numbers and not dashes (-) or any other symbols in the phone number box. Be sure to type the complete phone number, including the area code, such as 9375550528.
Once you have provided all necessary infomration, click the Save button to save that information and return to the Case Initiation options.
The plaintiff is now listed as a participant in the case.
Repeat this process as necessary to add any additional plaintiffs.
Adding Defendants or Respondents Defendants and respondents are the parties associated with the case who you do not represent. To begin adding defendants to the case, click the Add Other Parties button on the Case Participants line to display the Add Party options.
Fill in the necessary information about the defendant. Boxes marked with an asterisk indicate required information.
Once you have provided all necessary information, click the Save button to return to the Case Initiation options.
The defendant is now listed as a participant in the case.
Repeat this process as necessary to add additional defendants.
Adding Documents: Use the Add a Document dialogue options to review the documents associated with the
case. You can delete unwanted documents and then find any documents you
want to add and include them with this filing:
Category
First,
select a document category from the Categories drop-down list. This reduces the
hundreds of documents currently available to the specific documents for
that category. It also
changes the other options to match the category requirements.
Document Type
Select a Document Type from the drop-down list.
This document type is identified on the notice.
Emergency
Check this box if this document requires special emergency handling.
Additional Text
Type any information that you want to appear on the court docket sheet to help
identify the document for the case participants.
(This information is optional.)
Document Location Use
Document Location to find the documents you have prepared and attach them to
this case.
Add Clicking the Add button transfers the document listed in Document Location from your local directory to the Court’s eFiling server to be included in the submission. If the document is large, an “UPLOADING DOCUMENT, PLEASE WAIT” message may display. If a document requires additional information (such as an Answer or Instructions for Service), additional dialogues appear.
After a document has been transferred from your local directory to the court’s eFiling server, it is listed to be included with the submission.
Next
When
all documents to be included with the submission appear in the
document list, click the Next button to move to the next basic step
in the filing process.
You can use the following Add Documents options to learn about the documents displayed in the list:
Reviewing the Filing & Entering Payment Information:
The
Review and Approve Filing dialog is the final step in the filing process. You can use the dialog box options to
enter the necessary payment information for the filing and also to make one last
careful review of the filing before finalizing it:
Change Payment Method
button displays a dialog box where you can provide the credit card number for
the account where the filing fee will be charged.
Change Filing Info button returns you to the Case Initiation dialog box so that you can review the pertinent information about the case (Prayer Amount, Action Type, Cases Participants, etc.) and make any necessary changes.
The View Data link below the Change Filing Info button displays the
filing information in XTML format. You can copy this information into your local system
without having to retype it in manually.
Add/Remove Documents
The documents to be included with this filing are listed at the bottom of the
dialog box. You can click this
button to return to the documents dialog and add or remove documents
from the list.
Special Filing Instructions
Use this text box to make any notes to the clerk.
While
reviewing the filing, you can click the Cancel button to cancel the
filing or the Move to Draft button to save your work up to this point and
finish this submission at a later time.
Once you are certain that the filing is correct and complete, click the Next
button to send the filing.
eFlex displays a message asking you to confirm that your submission is complete
and ready to be transferred to the court. When you click the OK button, the filing
is submitted.
If the payment is successful and eFlex is able to submit your filing to the
court, a
“Your Filing has been submitted” message is displayed. It indicates that the fee
payment has been successfully processed and your submission is now being
transferred to the Court Clerk’s server for review. The filing information includes the Case Title, My Case Number, Court Case Number, Description,
date filed, account number, an authorization code, and the total fee amount.
A payment receipt will also be emailed to you.
You can click the Filing Status button to review the status of your
submission.
You can also use the Home link on the menu or any other link to go to a different point in the eFiles application and continue filing or editing current cases.
1. Prepare
your documents.
2. Select
an existing case.
3. Add
documents.
4. Review
the filing.
5. Submit
the filing and make any required payment.
Preparing Documents
Make sure you have electronically scanned any documents that you want to include
and also that you know their location.
Selecting the Existing Case
Click the
My Cases
button on the home page or select
Cases
>
My Cases
from the Home menu to list the cases in which you are a participant.
If the case you need is not listed, type the case number in the Case Number
box and the participant's last name in the Participant’s Last Name box, then
click the
Submit
button.
If you cannot file on this case an error message appears. Otherwise the Add
a Document dialog for that case appears.
Note that the Case Number is now highlighted in a bright yellow bar to indicate that you are currently filing to an existing case:

Adding Documents
Use the Add a Document options to make any necessary changes to the
documents included with this filing, then click
Next
to move to the next basic step in the process.
A few selected document types may involve additional fees. When additional
payment information is necessary, the Payment Method options appear. You can then click the
Change Payment Method
button and provide the credit card number for the account where the filing fee
will be charged.
Reviewing the filing
Update any necessary information about case participants. Double-click the name of any
participant to display pertinent information about that participant, such as
party type, name, address, phone, email, etc.
Make any necessary changes to this information, and then click the
Save
button to return to the Review and Approve Filing Dialog box.
Use the
Special Filing Instructions
text box to type any notes to the clerk.
Once you are certain that the filing is correct and complete, click the Next button to send the filing.
Whenever you eFile a case to the court, the case status is immediately
updated to reflect its progress.
These status changes happen rapidly as submissions are processed by the court
server; sometimes so rapidly that you may not even notice them. You can use the
Filing Status dialog box to display and track the status changes for each
submission.
It's a good idea to review filing statuses regularly to make sure that submissions are efficiently processed. For example, a status may include a note from the Clerk of the Court notifying you of additional fees due.
To list current filing statuses from the eFlex home page, click the Filing Status button or select eFile > Check Status from the Home menu.
Each entry in the list represents the status of a submission.span
style="mso-spacerun: yes"> These entries are temporary and are
deleted after a time period set by the system administrator, usually at least
30 days.
The current status of a filing is listed in the Status column, as follows:
Sent:
Documents and data have been transmitted to the Clerk Review system.
Received:
Documents and data have been received by the Clerk Review system and the filing
time has been recorded.
Filed:
A clerk has reviewed your information and returned an electronic receipt of the
results. If your submission
contains only a Proposed Order, the status of ‘Filed’ indicates that the
Proposed Order has been transferred to the judge for action. It does not mean that any official
action has actually been taken.
Awaiting Approval: The submission is awaiting approval. The court clerk has not yet reviewed
and approved the filing.
Rejected:
The submission has been rejected and the receipt provides the reason for the
rejection. You can click the
Resubmit
button to create a new submission based on the previous submission. The
potential new submission will include links to the documents from the rejected
submission.
Resubmitted:
This filing has been resubmitted.
Package Pending: Documents and data are being prepared in an electronic package to be sent to the Court's Clerk Review system.
Clicking the link for a filing in the Status column displays a Filing
Status dialog box with extensive details about that filing.
If you want to limit the list to a set time period, use the calendar icons to select a starting and ending date,
then click the
Go
To display the documents associated with that filing, click the [+] symbol next to
it in the Filing ID column. The [+]
symbol changes to a [-] and the documents are listed. You can then click a document name
link to display the contents of that document.
Clicking the [-] symbol next to the document type hides the document
list.
The Draft feature acts as a backup if you are disconnected from the internet. Whenever you begin creating a new submission, eFlex records data each time you advance to the next screen, including any document data you have loaded. If your internet connection goes down, the system creates a draft of your submission. When you're back online, you can continue the process. Each time you log out, you will be prompted if you have any partially completed submissions.
To resume work on a draft filing:
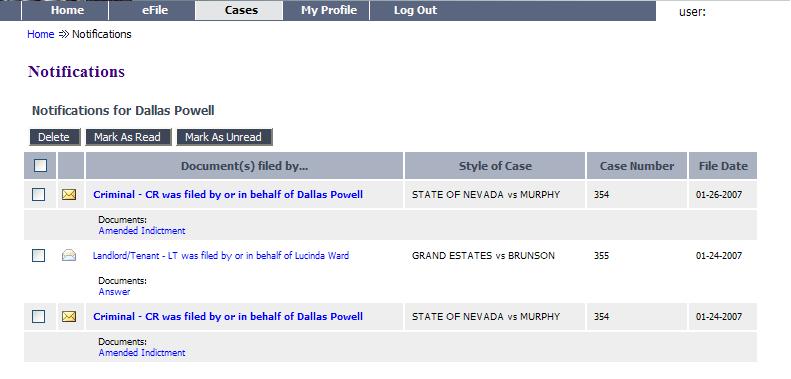
Once you have eFiled a case, your are electronically linked to that case number. Whenever someone sends a follow-up submission on that case, the efiling system sends you an email message and posts a Notification of Electronic Filing (NEF) to your account.
You only receive NEF notifications on cases that appear on your My Cases list. This list displays the cases in which you are registered as a participant. If you want to be included as a participant on a case that is not listed, you can eFile a Notice of Appearance on the case. A clerk will review the submission, and, if it is approved, the clerk will add you to the case.
Note: Notifications are not permanent. They are deleted after a set period of time, as determined by the court. Also, they do not replace current court rules and procedures which require filers to send paper notifications to the parties involved in the case. It's a good idea to check your notifications regularly, download any documents associated with them, and then delete the old notifications. Notifications that haven't been viewed have a closed envelope icon beside them. Once you have reviewed a notification, its envelope icon opens.
To view the NEF list:
Notifications do not display detailed case information; for more complete information, click My Recent Cases on the home page or select Cases > My Cases from the home menu.
Note: Receiving a courtesy notification does not necessarily guarantee that the clerk will accept the submission. If there is a problem with the submission, the clerk can still reject it. However, a courtesy notification does alert you as to the intent of the other parties on the case.
There are three conditions that could cause your filing to have payment problems. They are:
For the first two conditions listed eFlex cannot tell whether payment was made or not because epay did not return to the efiling system with an update. For both of these conditions you need to look at the Filing Status screen and click on the Make Payment button. eFlex will query epay to see if payment was completed. If payment was completed the efiling system will complete the submission and display the “Your Filing is submitted” page with the payment information. From this point your filing will receive a time stamp. If payment was not completed the efiling system will redirect you to the epay system to make a payment. If the epay system does not return you to the efiling system you should repeat this step. If after a few tries the payment process continues to fail you should contact the court and ask how they would like you to proceed. If payment was collected and for some reason your filing was rejected the court has money and no entry in VACP their case management system to associate the payment with.
Note: Make sure you keep your epay receipt in case you need to request a refund.
The steps below identify the proceedure to request a refund from the courts.
Note: When processing the refund, the epay processing fee will not be part of the refund. Those fees are collected by epay and are part of the value the court can refund.